HOW
TO SEND A WINZIP FILE
WinZip
is a utility program that allows you to compress and collect several
files so that you can send them as a single attachment via email.
This is especially useful if you want to send someone a collection
of pictures or graphics. These directions will show you how to create
WinZip files. The directions will also explain how an email recipient
will "extract" and save the individual files to their
hard drive. If you don't have WinZip, you can download an evaluation
copy from their web page; WinZip.com
. Your email recipient does not need this!
I
am going to write these directions as if you were going to send a
collection of pictures. Keep in mind that WinZip can compress
and collect any kind of files.
 CREATING A WINZIP FILE
Create
a folder somewhere on your computer and save your collection of pictures
to that folder. I suggest you create a folder on the desktop.
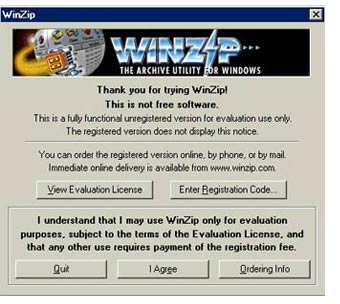
Start
WinZip by double-clicking the desktop icon or by going to Start,
then Programs, and then WinZip. If you are using an
evaluation copy of WinZip you will see the following screen.
Click I Agree.
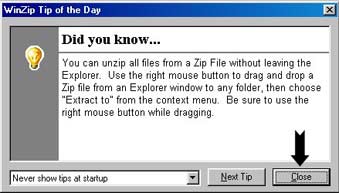
If the
Tips screen appears (see below), click on Close.
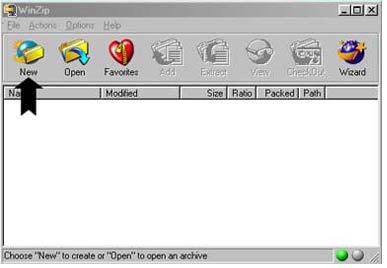
You are
now at the Main WinZip screen as seen below. Click on New.
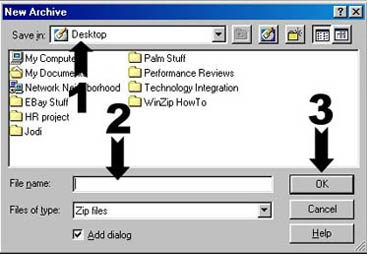
You will
now be asked where you want to save your WinZip file and what you
want to call it. I suggest saving it to the Desktop so it is easier
to find later. You can call it anything you like. Follow the 3 steps
suggested in the diagram.
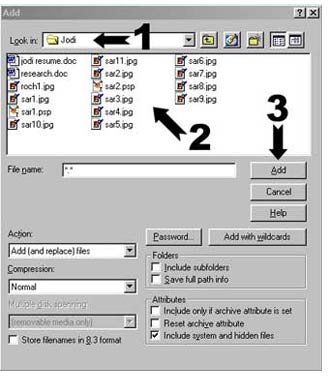
Now
you are at the Add Files screen. Find the folder with your pictures
in it. Hold down the Control Key as you click on each picture
you want to add to your Zip file. Finally click on Add.
See the screen shot that follows.
Once you've
clicked on the Add button the Zipped file will be created where you
told it to. If you followed my directions there should be a
zipped file on your Desktop. The icon for it looks like
a file cabinet held in a vise. You are now looking at the following
screen.

HOW TO MAKE YOUR ZIP FILE SELF EXTRACTING
This
makes it very easy for the email recipient!
You
could just close the window above and send the Zip file you
just made as an email attachment. However, your email recipient would
need to have WinZip to retrieve the files within. Here's how
to make that file be self-extracting so they don't need anything.
While
still on the screen above, click on Actions and then on click
on "Make .Exe file"

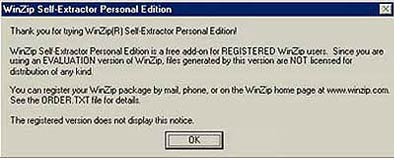
If
you are using an evaluation copy of WinZip you will see the
following screen. Click OK, but note the message. In my opinion,
it's best to purchase this very useful product.
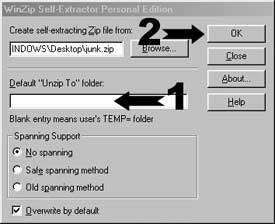
You will
now see the screen below. The Zip file you just made should be named
on the top line. If it's not, you may have to browse for it. Type
the following on the bottom line... "c:\windows\desktop\junk"
This will automatically create a folder on the email recipients desktop
called "junk". Now click OK.
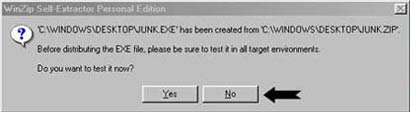
You
will be asked if you want to test your self-extracting WinZip file.
Click on No.
Close all
open windows. You are done! Now just send an email to someone
and attach this self-extracting WinZip file to it. You may want
to send along the following instructions.
HOW TO EXTRACT THE FILES SENT VIA EMAIL
Save
the emailed attachment to your desktop.
Double-click
on the desktop icon representing the file you just received. The screen
that appears will look something like the following;
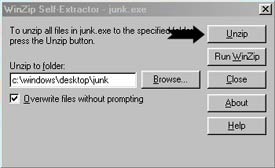
Simply
click on Unzip. Do not change anything else. A folder
will be created on your desktop and it will contain all of the pictures
that were sent to you in one complete folder.
Once
unzipped, you can delete the file that was sent to you unless you
want to email it to someone else.
BACK